Italian Herb Bread

the herbs which i have added to the bread are fresh basil, fresh parsley and dry rosemary along with sun dried tomatoes.
the result is a chewy, dense and aromatic bread flavored with the herbs and sun dried tomatoes. if you make the bread totally with all purpose flour/maida, then the bread won’t be chewy and dense.

ingredients
1 1/2 cup flour
1/2 cup all purpose flour/maida
2 tbsp olive oil
1 tsp dry yeast
1/2 cup water
1/4 tsp sugar
3/4 cup chopped fresh herbs or dry herbs - rosemary, basil, parsley
8-9 sundried tomatoes, chopped (optional)
salt as required
sea salt flakes or rock salt for finishing
fresh rosemary leaves or dry rosemary for finishing
method:
proof the yeast by adding it to the 1/2 cup warm water & sugar mixture.
keep in a warm place till the mixture bubbles.
mix the chopped herbs, sundried tomatoes, olive oil and salt together.
add the flours and mix well.
now add the yeast mixture and continue to mix.
add some 1 or 2 tbsp water if required to bind the dough.
knead into a smooth and pliable dough. the dough should not be sticky.
rub olive oil all over the dough and keep it covered in a bowl for 30-40 minutes till it doubles in size.
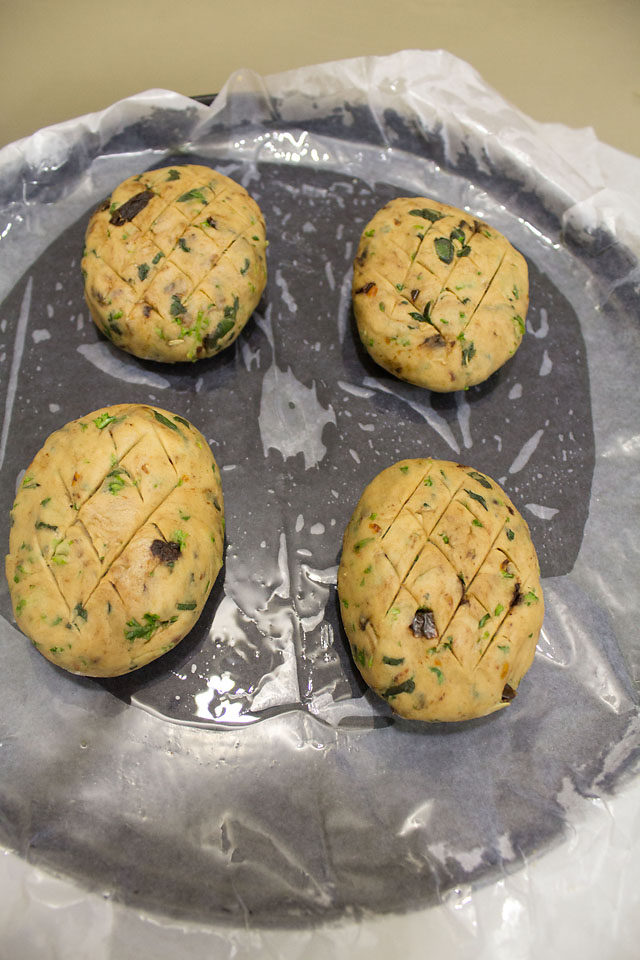
knead again and then make round or oval buns.
make a criss cross pattern on the buns with a knife.
sprinkle some salt and rosemary leaves on the bread.
bake in a preheated oven at 200 degrees C for 20-25 minutes or till the bread becomes browned.
serve warm.
1: the proofing needs to be done first. mix the sugar with warm water. add the dry yeast to this mixture. stir and leave in a warm place for the 15 minutes or till the mixture becomes frothy.




Tag :
Italian Herb Bread
Kokum Sherbet

i usually avoid buying the readymade kokum sherbet as i find them too sweet and also white sugar is added to it. i prefer to make my own kokum sherbet.
kokum also known as garcinia indica is a fruit bearing plant from the mangosteen family. the plant yields dark red colored fruits. you can see the dark red color fruits in the below pics. read more about kokum here on wiki.

this dried kokum is used to sour curries, dals and veggie dishes in the maharashtrian, gujarati, konkan, kerala and goan cuisine. it is mostly used to sour fish & prawn curries in the malvan and goan cuisine.
the dried fruit is a mildly souring agent. i add the kokum to my dals as well as make kokum curry-sol kadhi from it.
ingredients
1 cup kokum fruits, chopped or dry kokums
2 cups water
2 cups sugar
5-6 cardamoms powdered or crushed
1 tsp roasted cumin powder
a pinch or two of black salt or salt (optional)
method:
rinse the kokum fruits in water. (see notes below on making the sherbet from dry kokum)
chop the fruits and remove the seeds.
keep the pulp and the outer cover.
grind the fruit and pulp with little water.
strain the whole kokum mixture.
boil the sugar and water until the syrup becomes a little thick.
cool the sugar syrup and then add the strained kokum mixture to it.
add the roasted cumin powder and powdered cardamom.
mix well.
store in a jar or bottle and refrigerate.
when serving, dissolve 1 or 2 tbsp of the kokum sherbet in one glass of water.
add ice cubes and serve chilled.
my notes
follow this method if making the kokum sherbet from dry kokum peels:
1: rinse the dry kokum in water.
2: soak them in 2 cups of water for 3-4 hours.
3: collect the kokum in a blender and reserve the water.
4: grind them with some of the reserved water to a smooth mixture.
5: boil sugar with the remaining reserved water till the mixture becomes thick.
6: cool the sugar syrup and then add the kokum mixture to it.
7: add the powdered cardamom and cumin powder.
8: mix well and store in an airtight bottle or jar in the fridge.
if you do not want to make sugar syrup, then just dissolve the sugar in the kokum extract. in this case you don't need 2 cups of water. just 1 cup water can be used to soak the dry kokums and then grind them to a smooth paste. also you will need 1 cup sugar.


when you slice the kokums into two there will be the outer cover and the soft pulp inside with the seeds. these kokums which i had were very ripe. the outer shell had a very sour and a mild sweet taste while the inner pulp was very sour.


you can now add sugar to the strained mixture or cook sugar with water till the sugar dissolves. make a thick sugar syrup. then add the strained kokum extract to the sugar solution when it cools. spice the sherbet with some powdered cardamom and cumin.
the sherbet has to be refrigerated. store in an airtight jar or a bottle. for a serving of one glass of water, add 1-2 tablespoon of the kokum sherbet. serve chilled with ice cubes added to the sherbet.

kokum is one of the best natural coolants for the body.
it is excellent in reducing the pitta dosha as per ayurveda.
kokum sherbet and kokum curry helps in digestion and improves the appetite.
rich in vitamin c and is an anti oxidant.
kokum is also used to treat heat rash. on a side note i remember my mom rubbing the kokum on the heat rash which we would get as kids.
so what are you waiting for…. beat the heat this summer with this refreshing and rejuvenating summer drink.

Tag :
Kokum Sherbet
Mushroom Vindaloo

the portuguese goan cuisine offers really good recipes like xacuti recipe, ambotik recipe, cafrael recipe, bafad recipe, sorpotel recipe… but they are all made with meat. so the only option for vegetarians is to make the same recipe with veggies or eggs if you are an eggetarian.
generally the vindaloo paste is made and the meat is marinated in the paste. however, for vegetables you don’t need to do this, as whilst cooking the veggies will absorb the flavors of the vindaloo paste.

vindaloo is best had with plain boiled rice or the goan bread/pav. the spiciness of the dish can be reduced by using less amount of red chilies.
adding fried potatoes is optional and you could skip this part if you do not want potatoes in the vindaloo. but let me tell you, potatoes taste good in the vindaloo.

this recipe of mushroom vindaloo is strongly flavored with the spices and is a fiery, hot and very spicy recipe. reduce the amount of red chilies, ginger, garlic and spices if you want a less spicy mushroom vindaloo.
so here we go with the step by step recipe pictorial of mushroom vindaloo recipe…
Prep Time: 20 minutes
Cook Time: 40 minutes
Total Time: 1 hour
Serving Size: 4-5
ingredients
For the Vindaloo Paste:
10-11 kashmiri red chilies, deseeded
2 tbsp coriander seeds
1 tbsp cumin seeds
4 cloves each of 1 inch
2 inches piece of ginger
11-12 small to medium sized garlic
1 tsp turmeric powder
3 tbsp vinegar/malt vinegar
For the Vindaloo:
2 packet of button mushrooms, rinsed and chopped
2 medium sized potatoes, cubed
2 medium sized onions, chopped
2 green chilies, chopped
4 green cardamoms
4-5 cloves
10-12 black peppercorns
3/4 cup oil
1/2 cup chopped coriander leaves
2 to 3 cups water (add more water if you want a thin curry)
salt to taste
method:
Preparing the Vindaloo Masala Paste:
Grind all the spices and herbs mentioned for the vindaloo masala paste with vinegar to a smooth paste.
Preparing the Mushroom Vindaloo:
heat oil and fry the potato cubes. drain and keep aside.
in the same pan, fry the whole spices which are cardamom, cloves and peppercorns.
once they sizzle, add the chopped onions & fry till they become transparent.
now add the masala paste and fry the paste for some 12-15 minutes on a low flame.
keep on stirring the paste in between to ensure it does not get burnt.
add the green chiles and mushrooms and mix these well with the vindaloo paste.
saute the mushroom for 8-10 minutes.
add water, salt and simmer the gravy for 10-12 mins.
finally add the fried potatoes and simmer for 1 minute.
garnish with coriander leaves and serve hot.
lets begin with the masala ingredients. in the pic below you see all the ingredients for making the vindaloo paste.


while grinding the paste with vinegar, if the paste is too dry and you are not able to grind it… add some water to make the paste moist and for ease of grinding.
i have cooked the mushrooms while making the vindaloo, but if you have the time and patience, you could also fry the mushrooms and keep aside. once you have fried the masala paste well, add water and let it simmer. then you add the fried mushrooms and potatoes and simmer for 8-10 minutes so that the mushrooms absorbs the flavors of the vindaloo paste.
i have used kashmiri red chilies, but you could use any kind of red chilies or even a combination of red chilies.
the vindaloo can also be made with veggies like aubergines, cauliflower, mix veggies and also tofu and paneer. if using tofu or paneer, then marinate the tofu/paneer with the vindaloo paste for 45 minutes to 1 hour.
reduce the number of chilies if you want the vindaloo to be less spicy.
if you are not going to fry the potatoes, then use 3 tbsp oil instead of 3/4 cup oil.
Tag :
Mushroom Vindaloo
Beetroot Thoran: How to make Beetroot Thoran

Now what is a Thoran:
Thoran is a traditional Kerala dry vegetable recipe made with grated or finely chopped vegetables like yam (suran), bittergourd (karela) , cabbage (bandh gobhi), carrots (gajar) , beans (beans like chawli beans, french beans) , red amaranth leaves , drumsticks or drumstick leaves. The basic ingredients in which the vegetables are cooked are shallots, coconut, curry leaves, mustard seeds, turmeric powder, green chili or red chili and coconut oil.
Thoran is one of the dishes that is served in the Sadya along with the other dishes. ( A Sadya is a grand feast where a vegetarian meal comprising of various dishes is served on a plantain/banana leaf.)

If you do not like the raw taste of beetroot, than you should try this recipe. Its great. It goes very well with rotis, parathas and specially the Kerala Parota and even cooked rice. You could also have this recipe as a side dish.
In this recipe, I wanted some spiciness that would soften the sweetness of beetroot and coconut. So, I added both red chili and green chili along with ginger. I also added coriander powder, red chili powder and crushed whole garam masala. This was my variation to this recipe and the beetroot thoran was awesome and great.
You have to chop the beetroots finely. You could also use grated beetroot which will cook faster than chopped beetroots.
For all those who do not have fresh coconut, you could easily substitute with dry or dessicated coconut. Of course fresh coconut has a different taste, but the thoran tastes equally good with dessicated coconut too.

- 2 beetroots ( chopped or grated)
- 4 tsbp grated fresh coconut
- 1 tsp mustard seeds
- 1/2 tsp cumin seeds
- 4-5 shallots (chopped into 4 pieces)
- 10-12 curry leaves (whole or chopped)
- 1 whole red chili
- 1 green chili, finely chopped
- 3/4 tsp finely chopped ginger
- 1 tsp turmeric powder
- 1/4 tsp red chili powder
- 1 tsp coriander powder
- 1 cardamom, 2 peppercorns, 1/2 ” cinnamon, 1 clove ( crushed to a medium coarse powder in a pestle and mortar)
- 2 tbsp coconut oil
- salt
How to make the Beetroot Thoran:
- Heat the coconut oil in a kadai or wok.
- Add the mustard seeds. When they pop, add the cumin seeds.
- The cumin seeds will start to sizzle now. Immediately add the shallots and curry leaves.
- Fry the shallots on a medium flame for 2 minutes.
- Now add the whole red chili, chopped green chili and ginger.
- Fry for a minute.
- Add all the dry masala powders including the crushed and powdered whole garam masala.
- Fry for a half a minute and then add the beetroot.
- Mix the chopped beetroot with the rest of the spices.
- Add the grated coconut and salt
- Cover and cook the beetroot till it is done.
- To facilitate faster coking of the beetroot, you could add some 1/4 cup or 1/2 cup of water to the beetroot. Cover it and cook.
- Serve with rice, chapatis or even parathas.

Spring Onion Carving Tutorials
Implementation
Learning how to carve spring onions for food decoration is a basic of vegetable carving. Carved spring onions are mainly used as decorative elements for food dishes, or as part of display for a fruit and vegetable carving basket. The green curl strips of the onion leaves makes food dishes look more distinguished .
Equipment for spring onion carving
- A carving knife.
- Wooden cutting board.
- Spring onions
- Bowl of cold water
Choose fresh small narrow leaf spring onions and clean them in cold water. Cut leaves to about 2.5 inches in length. Immerse in cold water for about 10 minutes before carving.
Large spring onions leaves are not suitable for carving.

Use a carving knife to cut the leaves into 2-3 mm wide stips from the base to the end of the leaves.
Carve all leaves

Soak carved spring onion in cold water as when the carved leaves are immersed in cold water some of them will become saturated and warp and curl.
leave in water for 15-20 minuts

Hold carving knife and spring onion as in the picture
Curl stips by passing between finger and knife. Do not press too hard as stips will cut.
Soak for a futher 10 minuts

The finished carving will keep in fridge for over a week if put in sealed food container.

Tag :
Carving
Tomato Rice Recipe

Prep Time: 20 minutes
Cook Time: 20 minutes
Total Time: 40 minutes
Serving Size: 4
ingredients
5-6 tomatoes
1 large capsicum or 2 small capsicum
1 large onion or 2 small onions
1 inch ginger
6-7 garlic flakes
1/4 or 1/2 cup fresh coconut or dry coconut
1 tsp cumin seeds/jeera powder
1 tsp cumin seeds
3 cloves
1 inch cinnamon
3 tbsp oil
2 cups rice
salt
water
coriander leaves and fresh coconut for garnishing
method:
- slice the onions and capsicum.
- make a smooth and fine paste of the tomatoes, ginger, garlic, coconut, green chillies, cinnamon, cloves, jeera powder.
- clean and wash the rice. you can also soak the rice for 20-25 minutes.
- in a pan heat oil or ghee.
- fry the cumin seeds, bay leaves.
- add the sliced onions and brown them.
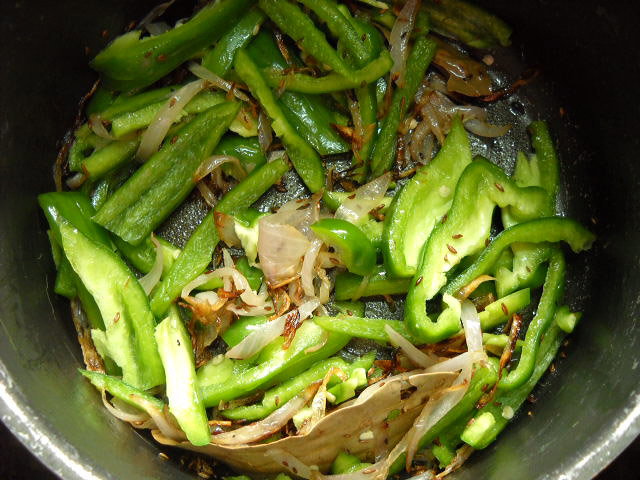
- now add the sliced capsicum and saute for 2-3 minutes.
- measure the masala paste in a measuring cup and add it.
- for 2 cups of rice you will need 4 cups of the paste.
- if the paste yield is less then add water.
- add salt and cover and cook the rice till its done.
- garnish with fresh grated coconut and chopped coriander leaves
- serve hot.

i wonder why its called tomato rice and not tomato capsicum rice. in the sheets that were handed out to us it was called tomato rice. since it uses less numbers of capsicum than tomatoes, at least logically for me i also decide to call it tomato rice.
lets begin the step by step recipe of tomato rice
you will need fresh juicy red tomatoes. of course i know you know that, but i have to write something…




serve the tomato rice hot hot…


tips:
if you want a more mushy rice add more water. thats what i did. i added 2 cups water later to get a mushy and soft texture.
use the same measuring cup that you have used to measure the rice.
you can also pressure cook the rice.
when the rice is cooking keep an eye on it by checking it with a fork so as to ensure that the rice does not stick to the bottom of the pan. add more water if the water dries up and the rice mixture looks dry.
to add more spice increase the quantity of green chillies.
Tag :
Tomato Rice Recipe


